This is to be a collection without order taken from many papers which I have copied here, hoping afterwards to arrange them according to the subjects to which they treat, and I believe that I shall have to repeat the same thing several times; for which, O reader, blame me not... Leonardo da Vinci

Friday, December 14, 2012

Your Commissions, Jill


I am working on the last piece and hope to be finished with it on Sunday, then complete the mat cutting and mounting of all thirteen. Here are the 12 others that you asked to be done... ready for inspection. If there are any matters you would like changed just ring me or send an email. I am working graveyard shifts the next two nights. 


Sunday, December 9, 2012

Drawing layers of hair in graphite

I have been asked how to layer graphite and what pencils to use, hence the new blog finally being brought together.


To shape how the hair will fall, I use a 2H pencil. Do not press too hard or you will make indents in the paper that will cause issues with the further darker applications. This is just to "map" out, shape and cover white of the paper.


Secondly, I use a B pencil to start building the density, add more shape/tone and movement. This commission has dark shadows around the back of the style and darker at the face. The light shined on the bulk of curve. Use different pressures in different directions so that the hair is not superficial, more natural. Watch how the light plays on the surface and directions of each hair.


Now start using a 2B pencil for layers of tones. Get lost in how each strand builds a more natural look.


Use a 5B to add the shadows, and eraser for light to make a more dimensional look. Put a stray hair or groups of hair out of place to give a more natural look.


Continue to push and pull the pencil layers until you are happy with the finished project.


Here are some other finished projects I have completed.


Tuesday, November 6, 2012

I promise I am working

You have gotta love Christmas season. I am keeping up with commissions while starting a new job at Big W and still doing some hours at the service station. Household duties and blog have been taking a step back. Just a catch up on some of the pieces I have completed.

Western Australian parents of a friend:


Client's mother in law:

Client's father in law:


Client's son-in-law's Jaja:

Now working on a client's father in law twice, then her mother twice and sister in law's mother. Then a family of 7 people. When I can get a sit down time I photographed the mother in law's hair as I worked in stages to show build up and did the same with the sun spots of Jaja. I will write up the posts soon.

Wednesday, October 3, 2012

Watercolour portrait Weekend- "One Eye Wide Open"

It was that kind of crazy long weekend that makes you want to scream lol.... So I got out the inktense pencils to see what I could come up with.

Doing that 1930s style with modern colours kind of day. It just takes a bit of layering and playfulness. I will set her aside for a couple of days and decide what if I want to do anything else with her.


Now onto the serious work.... Beginning number 2 of the same portrait. I have 2 total of this gentleman for a family christmas present extraordinary. I will finish him this morning and get going on the mother in law. (If you follow this blog you might remember the earlier portrait done of this gentleman for the client earlier this year. )


Pinterest
Have you been hooked into the Pinterest trend? I had no desire to go around pinning things until I realised "I already do". When I am research art history, art shows, methodology, etc. I save articles, pictures, etc. So I went onto Pinterest and now hooked. When looking for how the art trends are moving I pin it now instead of the loading my hard drive with stuff to look at. Give it a go... set up boards with pictures you are gathering for your next painting idea.

Family Support of an Artist
I have decided that as much as my boys says they support me pursuing artwork, they thought it would only be when they don't want something or attention. There is no respect in being around the work I am doing, or for myself when I am doing it. The statement clincher this weekend "you are going to draw...but your husband is home." So I have began researching an article for this blog about family support, nagging and their belief that art is not really a "job" because it doesn't have a week to week pay check. Time management for yourself is nothing if you don't get your 48 and 23 year old babies to be less dependant. Any suggestions for research material would be greatly appreciated: crofttravels609@yahoo.com.au. Hmmmm at a job I was lucky to clear $300 a week, in the 2 months I have been unemployed I have netted $2500 between artwork, yard sales, ebay plus have put applications into 58 jobs and worked 2 days a week at old job for rent money. Imagine if I really inputed time into the effort how much I could earn.

Thursday, September 27, 2012

Day 3 and Finished 1945 Portrait

Adventurous is trying to work on a drawing while everyone is home and still demanding on your time. I may have to look into finding my own space away from home.

Anyways....
Here is the first few layers of hair, adding the razor marks that will be lightened during the finishing stages of shading. 


I then start shaping the face with the dark shadows around the cheek area down to the chin. This will also take several layers with 2H and B pencil.

 Progression of the shading across face. Always curve your lines around like you are sculpting the face with pencils. Feel where the bone structure will be strongest.


 Then start shading in the shirt in tie. Shirt is done with the same pencils of the hat, tie is a build up of 6B and 9B to get the correct darkness and hit of light. Curve the strokes to build up depth, short soft strokes for smooth surfaces.


Then we have a finished product...well it will sit for a day or two then I will go back over where I think more shadows and detail need to be inputed. 


Compare with the original photo, and I already see areas that need darkening. It will be left until I am refreshed and have good light to produce right effects.


Wednesday, September 26, 2012

Part 2 - 1945 portrait

Well yesterday I got sidetracked with a friend coming from Perth and taking husband to the doctors, so I didn't get to touch the drawing.

This is the ending result of Day 1


I finished the "C" strokes of the ribbed band, discovered a buckle and strap along it and filled in the brim. I used the B pencil to start the shaping of brim and added contour with the 9B pencil.

Start of Day 2:
I started definition of eyes, brows and beginning shadows for depth around the face. Using the 2H pencil I being picking where I want to add the shadow and lines of the face. The eye is the most important role so must be dealt with carefully. This gentleman has very light blue eyes that should command the portrait.


I used the 2H and B pencils to contour the shadows for shape, not going too dark until the finishing touches. They pupil begins with a light touch for colour with 2H then B for making the outline and pupils. Do not start the lashes until you are satisfied with the shading. I then used a 6B pencil for initial layout of eyelashes and adding more contour around the socket shadow, finishing with a 9B for depth and darkness.


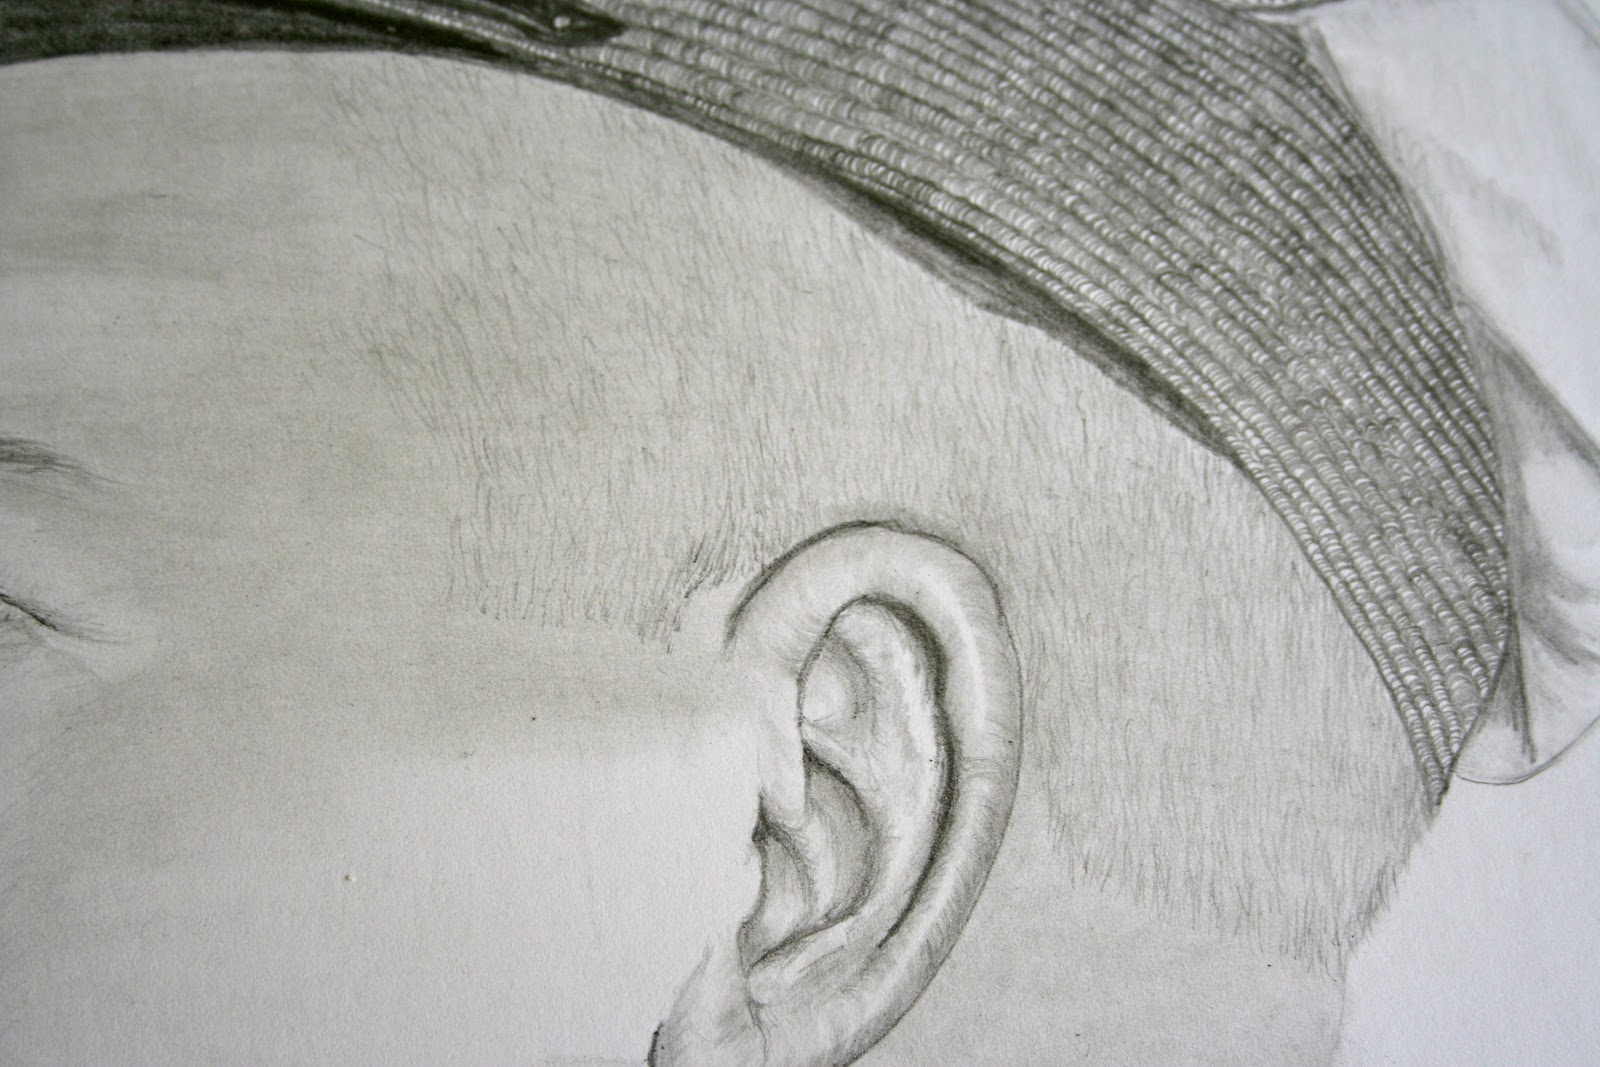
Next I build up the shape of the ear using the same pencils and "C" strokes for curves. I blend with paper stump to fill in all colour and keep building until I am satisfied withe the definition. I do all this by  trail and error judgement of my lines and shadows. The smooth Bristol paper being used is forgiving of colour, but do not press to hard for dents in the paper that will make white lines the graphite is missing.


Next start building shadows of the skin colour for hair and forehead. If hair is begun before a base effect is established you loose all the strokes you do for hair. Using the 2H I continue to softly add graphite then blend until I achieve the colour of the skin in this area. Pay attention to how the shadow of the hat brim curves around the forehead and light falls directly on the frontal features. 


Now take the HB pencil and lightly lay short "X" strokes in various places where the hair lies. Pay attention to where the hair line directions are, and ends at sideburns, neck etc. Do not layer to deeply for beginning, this is just a base hair definition. This gentleman's hair is not thick in most areas so the lines will be further spaces and hair shafts are short so they will be dealt with in short strokes. 


Once you have the base hair layout then look for where the hair is thickest for more defining strokes and build up. This section will take a few hours to complete then I will use 2B pencil for added shadow definition and distinction. 

Hopefully I will get the hair done and start shadowing the mouth, chin and neck today. Husband is home throwing up and son is off work. If they know what is good for them they will leave me alone most of the day. I will keep track if I get further than these steps and list them tomorrow.

Monday, September 24, 2012

Day by Day Portrait

I have received 5 portrait commissions of 3 people, so I thought I would try to give a blow by blow build up of what I do to complete one. 

Set up your area with paper, pencils, etc.
Have husband come home and have you run him to Scotts Auto for work truck parts and find out son has killed your car battery.
Sit down to the drawing board and sketch up a light sketch wit the F pencil. I use this grade because it doesn't scratch up the paper and is easy to erase as your work over your photo.

Answer the door 3 times for people and answer 2 marketing phone calls. 

Enlarge the photo with any photo program that will allow you to zoom in and out for detail. I zoom closer to the hat for detail of the badge using 3H and B pencils work up some resemblance to give the impression of depth and detail. 


While close up I notice there are ribs in the band. I use the B grade to show indent of ribs while following the shape of the hat around the band. Then fill in with "C" strokes over each rib varying the pressure. This can be tedious so I switch to the top of the hat using the 3H and start filling in shadows. This is purely a feel and look exercise. Look at the shadows and follow the shades using varying pressure strokes, then blend with paper stump lightly as if it is going across the surface of the hat. Blend up layers to darken and feel your way across the shape of hat. Then back to the "C" strokes.


You are not trying to duplicate the photo. Why draw it if you just want the same image. You are capturing an essence and spirt of the subject. 

Now hubby is making another entrance to the house with work truck and I have to start dinner. In between I will continue working the band then brim. 

Until tomorrow's update.